
Hi all Vicki-Ann here today with some Mail Art. It is so fun to get mail art in the letter box. I am sure it makes the postman smile too.

- Helmar Premium Craft Glue
- Painted papers
- Gelli plate
- Decoart Acrylic paint
- Brayer
- Scissors
- Envelopes
- Stencils for adding details
- Pens for doodling
Using my small Gelli plate on my acrylic block. I added small amounts of acrylic paint. Then using my brayer. I rolled it out and then rolled the excess paint onto my cardstock. I also pressed papers onto my Gelli plate to get some prints too.

Then using my Helmar Premium Craft Glue on the back of the cardstock I added it to the left side of my envelope.

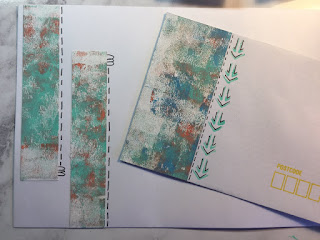

Cutting the excess off with my scissors. A simple way to add some fun to a plain envelope.

This one I painted the envelope with my brayer and using my Gelli plate as a stamp I stamped on the right side.

I then cut some circles out of one of the prints. Using some of the Helmar Premium Craft glue I added these to the front on the left side.

I drew around them with my black pen and did some scribble writing. Added a few tiny stenciled circles over the top with a TCW stencil.
I also added a bit of stitching in black with my sewing machine making sure to keep to the edge.


